Tool Management
ncSender keeps a Tool Library — an inventory of your cutting tools — and surfaces the tools you use most as tool buttons in the visualizer, alongside the Tool Length Setter (TLS) and Probe. When you install a tool-changer plugin, it takes over these controls and drives tool changes for you.
Tool Library
Open Settings → Tool Library. This is where you keep an inventory of your bits and assign them to the slots (pockets) in your tool magazine.

Add, edit, and delete tools here. Each tool holds:
- Tool number — the pocket / magazine slot it's assigned to (leave unassigned to keep a bit in inventory without occupying a slot)
- Name — a description such as 1/4" Flat Endmill
- Type — flat, ball, V-bit, drill, chamfer, surfacing, thread-mill, or probe
- Diameter
- Tool length offset (TLO) and its TLS probe offsets (X / Y / Z)
- Notes and SKU for your own reference
Assigning a tool to a magazine slot
A tool only occupies a magazine pocket once you give it a slot. There are two ways to do that:
- From the Add / Edit Tool dialog — set the Assigned To Slot dropdown to a slot
(
Slot 1,Slot 2, …). Leave it on None (Not in magazine) to keep the bit in inventory without a pocket. - From the tool table — click the tool's slot cell (the
SLOT#/ No Slot badge in the Tool ID column) to open a slot picker, then choose a slot.
The available slots are limited by Magazine size — you can only assign Slot 1 through Slot N, where N is the magazine size.
Slots swap automatically
If you assign a tool to a slot that another tool already occupies, ncSender swaps them — the other tool moves to the slot the current tool just left. You won't get a conflict error.
Shrinking the magazine
Lowering the magazine size unassigns any tools sitting in slots above the new size (it asks you to confirm first). The tools stay in your library — they just lose their slot.
Assigned tools show an amber SLOT# badge in the table; unassigned ones show
No Slot. The slot strip along the bottom is a quick visual map of the magazine — click
an occupied slot to jump to that tool in the table.
Tool button controls
The Tool Library also decides what appears in the visualizer's tool area:
- Magazine size — how many numbered tool buttons (T1, T2, …) to show. Set it to the number of pockets you use; set it lower to hide unused slots.
- Manual — show the Manual tool-change button (for non-ATC workflows).
- TLS — show the Tool Length Setter button.
- Probe — show the Probe button (tool T99).
Plugins take over these controls
When a Tool Changer category plugin is installed and enabled, these controls are disabled and a message shows which plugin owns them — "Controls are disabled because they are currently controlled by Plugin: …". The plugin decides how many buttons appear and whether TLS / Probe are shown. Disable the plugin to hand the controls back to the Tool Library.
Tool Buttons
The tool buttons live at the bottom-right of the visualizer.
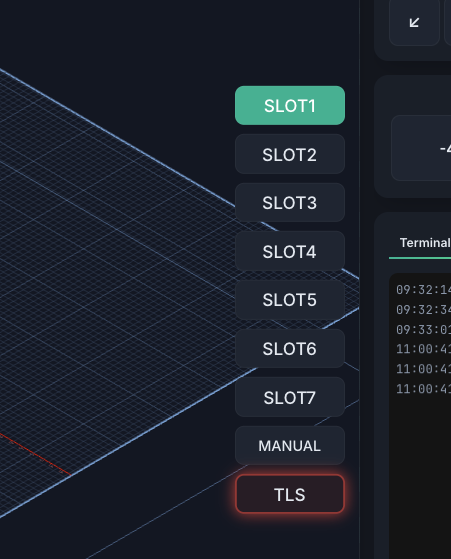
- T1, T2, … TN — one button per magazine slot. The active tool is highlighted, and any tool that appears in the loaded G-code is marked so you can see what the job needs.
- Manual — for manual tool-changer workflows; active when the current tool isn't one of the numbered slots.
- TLS — runs the Tool Length Setter (see below). Disabled when no tool is loaded.
- Probe — the probe tool (T99); active while the probe is the current tool.
Press and hold a tool button (about half a second) to trigger it. Numbered tools issue a
tool change (M6); the TLS button runs $TLS.
Tool Changer Plugins
Tool management is extended through Tool Changer category plugins:
- Rapid Change ATC — automatic tool changer support
- Manual Tool Changer — guided manual tool changes with TLS
While one of these is enabled it becomes the source for the tool settings above — it sets the button count and forces the appropriate TLS / Probe options on. Removing or disabling the plugin returns control to the Tool Library.
How M6 is handled (grblHAL)
Whether a plugin is installed changes what happens when the program (or a tool button)
issues an M6 tool change:
- No tool-changer plugin — ncSender passes
M6straight through to the controller. On grblHAL, the firmware then handles the change according to its$341Tool Change Mode setting. - Tool-changer plugin enabled — ncSender intercepts
M6and runs the plugin's own tool-change routine instead of leaving it to the firmware.
The grblHAL $341 Tool Change Mode options are:
$341 |
Tool Change Mode | Behaviour |
|---|---|---|
| 0 | Normal | Allows jogging for a manual touch off; set the new position manually. |
| 1 | Manual touch off | Rapids to the tool-change position; use jogging or $TPW for touch off. |
| 2 | Manual touch off @ G59.3 | Rapids to the tool-change position, then to G59.3 for a manual touch off. |
| 3 | Automatic touch off @ G59.3 | Rapids to the tool-change position, then to G59.3 for an automatic touch off. |
| 4 | Ignore M6 | The controller ignores M6 entirely. |
The tool-change position above is the tool-axis home, G59.3, or G30 position depending on your other grblHAL settings.
FluidNC
This passthrough behaviour is documented for grblHAL. FluidNC tool-change handling isn't covered here yet.
Tool Length Setter (TLS)
The TLS establishes a Tool Length Reference (TLR) so Z stays consistent across tool
changes. Pressing TLS (or running $TLS) performs the measurement:
- Switches to the TLS probe input (if a separate probe source is configured).
- Moves to the TLS position and probes Z to touch off the tool.
- Sets the tool length offset for the current tool.
- Restores the normal probe source and returns to the previous XY position.
The glowing TLS button
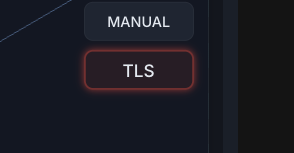
When a tool is loaded but its length hasn't been measured yet, the TLS button pulses with a red glow. It's a reminder that no Tool Length Reference is set — run TLS before you rely on Z.
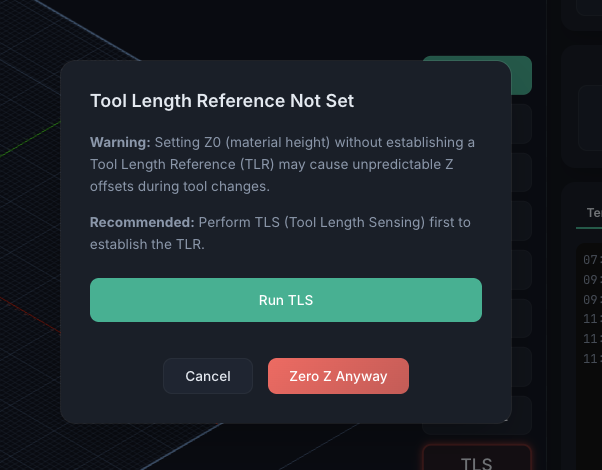
If you try to set Z0 (material height) without a Tool Length Reference, ncSender interrupts with a warning dialog — "Tool Length Reference Not Set" — explaining that zeroing Z without a TLR can cause unpredictable Z offsets during tool changes. You can:
- Run TLS — measure now to establish the reference (recommended), or
- Zero Z Anyway — proceed and set Z0 without a TLR, or
- Cancel.
Laser mode
Tool buttons and the TLS glow/warning don't apply in laser mode — there's no tool length to reference.