Jog Controls
Jog controls let you manually move the machine to position your workpiece, set zeros, or verify clearances.
Jog Panel Layout
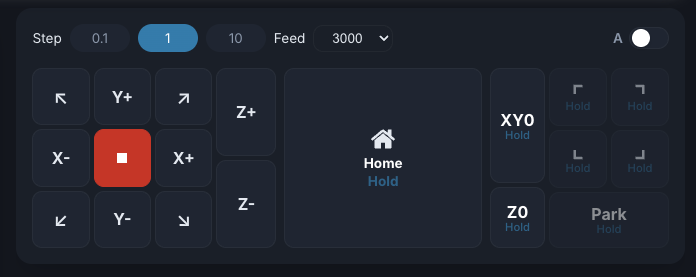
The jog panel consists of:
- 3×3 XY grid — Directional buttons including the four diagonals
- Center stop button (red) — Soft reset (
0x18); halts all motion immediately and always stays enabled - Z+ / Z- buttons — Vertical movement
- A toggle (top-right) — Switches the Z buttons to A+ / A- for 4th-axis rotation (when a rotary axis is configured)
- Step selector + Feed dropdown — Jog step size and feed rate
- Home — Homing (see Homing)
- XY0 / Z0 / Park — Go-to-zero and parking (see Go To Zero & Park)
Step Sizes
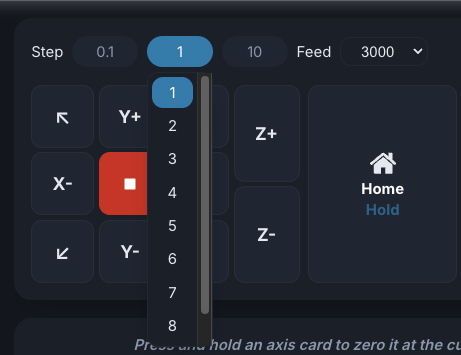
There are three step buttons — a small, medium, and large range. Tap a button to select it; long-press (500 ms) to open a dropdown with every value in that range. Each button remembers the last value you picked, so switching between ranges keeps your preferred step for each.
| Button | Values available in the dropdown |
|---|---|
| 0.1 | 0.05, 0.1, 0.2 … 0.9 |
| 1 | 1, 2, 3 … 9 |
| 10 | 10, 20 … 100, 150, 200, 250, 300 |
| Button | Values available in the dropdown |
|---|---|
| 0.01 | 0.001, 0.005, 0.01 … 0.09 |
| 0.1 | 0.1, 0.125, 0.2, 0.25 … 0.9 |
| 1 | 1, 2, 3 … 10 |
Feed Rates
Each step button has its own feed rate, set with the Feed dropdown next to the step selector. The rate applies to XY moves; the other axes are scaled from it:
- Z-axis automatically jogs at 50% of the XY feed rate
- A-axis (4th axis) jogs at 25% of the XY feed rate
Jog Modes
Step Jog
A quick tap (released within ~300 ms) moves a fixed distance — the selected step size. Each tap sends one discrete movement command.
Continuous Jog

Hold a direction button (longer than ~300 ms) to move continuously. The machine
moves at the selected feed rate until you release the button, at which point an
automatic jog cancel (0x85) stops it right away.
Diagonal Jog
The four corner buttons (↖ ↗ ↙ ↘) move both X and Y axes simultaneously.
Keyboard Shortcuts
| Key | Action |
|---|---|
| Left / Right | Jog X- / X+ |
| Up / Down | Jog Y+ / Y- |
| Page Up / Page Down | Jog Z+ / Z- |
Quick Zero
Double-click an axis card in the DRO to manually type a coordinate value. Long-press an axis card to zero it at the current position. See DRO for the full set of gestures.
Homing
Use the Home button in the center of the panel to run a homing cycle. As with the other action buttons, homing is a deliberate press-and-hold so it can't fire by accident:
- Hold the Home button (about 1 second) to home all axes (
$H). A progress bar fills while you hold, and the cycle starts when it completes. - Double-tap the Home button to split it into individual HX / HY / HZ buttons.
Hold one to home just that axis (
$HX,$HY,$HZ) — handy when you only need to re-establish a single axis.
Go To Zero & Park

The buttons on the right of the panel move the machine to a position — they don't set one. Hold a button to run its move; a progress bar fills as you hold.
- XY0 — Hold to rapid to work X0 Y0. The machine retracts to a safe Z height first, then moves in XY. Double-tap to split into separate X0 and Y0 buttons, each of which holds-to-move a single axis.
- Z0 — Hold to move Z to its work zero.
- Park — Hold ~1 second to move to the saved parking position (safe Z retract first); keep holding to about 2 seconds to save the current machine position as the new park location.
Setting zero vs. going to zero
These buttons travel to a stored zero. To set a work zero at the current position instead, press and hold the matching axis card in the DRO.
Homing requirement
When homing is disabled ($22=0) these move buttons are always enabled. When homing
is enabled, the machine must be homed first before it will travel to a stored
position.